- Of all the projects I made in this course, my favorite was definitely the video essay. This was the project I actually enjoyed creating and that showed in my final product. I was most comfortable making the video which allowed me to successfully portray my intended analysis. In the end, I think this project represented my work better than any of the others because it made a clear and obvious argument while also remaining visually appealing.
- I struggled most with the audio description project. I struggled too much with the software to be able to comfortably create a visually and audibly appealing video. Most of time I was simply struggling to fulfill the requirements instead of actually creating a project that I was proud of and the end product was not my best work. If I had a chance to do this again, I would chose a source file that had less speaking because I struggled most with my timing and fitting the descriptions into the spaces.
- Over the course, I have contributed in giving my classmates feedback on their projects. Although I was not the most vocal in class, in small groups I was able to better convey my opinions and impressions. Additionally, in small groups, I could give my peer suggestions for the projects that they might not have realized on their own. However, I do wish I had participated in class more often. It got easier as the semester went on and I just wish I could’ve started earlier.
Blog
Curator Statement
I just wanted to start off by saying I really loved your presentation, I’m such a huge fan of Shawshank redemption so it was interesting to see how you played with it. I liked how the symbolism progressed throughout the edits and you managed to fit all your ideas in without it seeming rushed or overwhelming to the audience. I also enjoyed the interjections of text. I think it really helped clarify what you were going for and made it seem more like an essay and less like a pechakucha(?) in my opinion. It showed the symbolism in the movie very well, especially the posters of women, which symbolized freedom to the main character. Good job!
-Alyssa M.
Premiere Tutorial
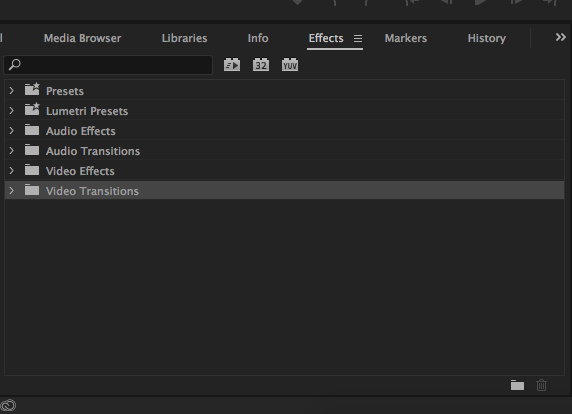
When working on video edits, sometimes hard cuts are the best choice. They can be aesthetically pleasing while also creating a sharp image contrast that mirrors the original content. However, sometimes these hard cuts can’t be used nicely in a video essay. I found that, for a lot of my scene transitions, I didn’t want a hard cut. They looked too harsh and, because the scenes weren’t chronological, it was jarring. Therefore, I needed to find a work-around to that. Thus, I discovered how to add transition effects, my favorite being “cross dissolve.” Here’s how to add this effect:
First, in the bottom left editing box, select the tab entitled “Effects”
Next, expand the “Video transitions tab” and then the “Dissolve” under that
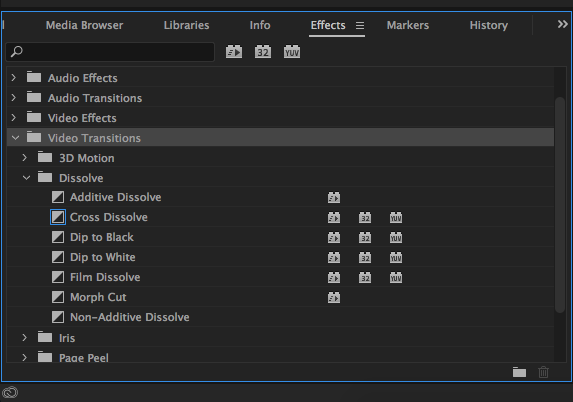
Select “cross dissolve” and drag the effect onto the desired video clip. A white box will appear on the video bar labeled as “cross dissolve”
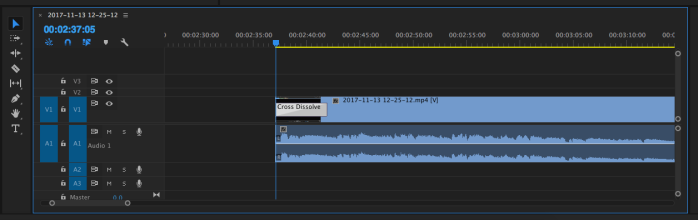
Once the effect is added to the video, you can then lengthen or shorten it to get the desired speed. Either way it’s used, however, the effect will allow your video to fade in from black, thus eliminating harsh cuts.
Videographic Abstract
For my video essay, I would like to focus on the idea of symbols. Symbols are prevalent in every type of media: books, movies, TV shows, songs, etc. For the sake of The Shawshank Redemption, I will be examining objects as symbols in the movie. This film focuses on the idea of hope blossoming out of despair. Therefore, it is ripe with objects that represent this. In order to reflect this sentiment in the movie, I will use on-screen text to define symbols and describe their uses in common films. Additionally, I would like to work with color. Because most of this movie is bleak and seemingly not hopeful, the symbols can be very subtle. Therefore, I would like to highlight the actual objects. I would like to try and use filters to make the objects a specific, vibrant color. However, with this technique, I’m afraid I won’t be able to pull it off technically. To combat this, I could also simply outline the object or circle it instead of isolating the image and making it a specific color.
Nevertheless, this video essay will work to pinpoint the important objects that symbolize hope in the time of hopelessness. More specifically, these symbols will be things that foreshadow Andy’s escape from Shawshank. Throughout the movie, Andy is working on his escape but the audience doesn’t know that until he actually disappears. With this essay, I will show how the movie uses symbolic objects to foreshadow these events.
Blog #9
For my video essay, I decided to work with The Shawshank Redemption. This movie is critically acclaimed, well known, and, consequently, widely studied. Because of this, there was no shortage of scholarly analyses of the movie.
Here is a list of ten articles analyzing various aspects of The Shawshank Redemption and a brief synopsis for each:
- “Listening to the Self: The Shawshank Redemption and the Technology of Music” by Daniel K. L. Chua.
This article explores the use of music as a symbolic, expressive medium. More specifically, it discusses how The Shawshank Redemption reflects an ever-changing mode of listening. Focusing on the opera scene, this article shows how viewers use music to construct identity and how this movie successfully achieved that.
2. “Projecting the Prison: The Depiction of the Uncanny in The Shawshank Redemption” by Michael Fiddler
This article discusses the nature of Gothic prisons as simulacra of the myth of prisons. It relates this idea to the portrayal of Shawshank in the movie and how the movie reflects the idea of an extinct prison instead of real life.
3. “Cinematic Carcerality: Prison Metaphors in Film” by Jan Alber
Adversely, this article proves that the depiction of Shawshank is no more than a metaphor for everyday things in life. Through this metaphor, the movie allows viewers to explore their yearning for meaning. These metaphors also serve to address of criticize certain aspects of society.
4. “Hope in ‘Rita Hayworth and Shawshank Redemption’: A Human Becoming Hermeneutic Study” by Rosemarie Rizzo Parse
This article simply discusses the portrayal of hope in the movie. It touches on the very obvious symbols of hope and how they can be interpreted.
5. “The Value of Hope” by Luc Bovens
Likewise, this also facilitates a discussion of hope as portrayed in Shawshank Redemption. It explores hope as a philosophical concept and how it works itself into the movie. It contrasts the scenes of seeming hopelessness to the hopeful ending.
6. “Redeeming the Myth of Upward Mobility: The Shawshank Redemption” by Peter Gutierrez.
Speaking on the inter-nationality of the film, Gutierrez points out various religious allegories. He uses these examples to explain the movie’s appeal and overwhelming popularity.
7. “The Shawshank Trail: A Cross Disciplinary Study in Film Induced Tourism and Fan Culture” by Richard Roberson and Maura Grady
This article touches upon the fan base from this movie. The authors explain what the movie did to attract such an audience and how it has influenced viewers. This is more of an exploration of the fans and their specific demographics and expectations as motivated by the film.
8. “Thoughts on a New Grandmaster” by J. Madison Davis
Davis focuses more on Stephan King and his influence on the story. It talks about his prevalence in both novels and film. Additionally, she discusses how this movie helped solidify his status as a serious writer.
9. “Diva Traffic and Male Bonding in Film: Teaching Opera, Learning Gender, Race, and Nation” by Charles I. Nero
This article discusses the idea of gender and heterosexuality in the film. More specifically, it talks about how the movie actually challenges gender norms through its main character and his traits.
10. “The Aesthetics of Redemption: Released Prisoners in American Film and Literature” by Mike Nellis
A little different, this article talks about the aesthetics and the narrative of the film. It focuses on how the released prisoner is portrayed and how that comments on the control espoused by the criminal justice system.
Blog #8
When working with recorded audio, sometimes it’s very difficult to reduce the “p” sounds. One obvious way to fix this is by rerecording the audio. However, that’s usually tedious and time consuming. S while a lot of that noise comes from the recording itself, it can be reduced after the fact.
In audition, it can be difficult to find the proper tools or filters to use. For someone like me who has never used the software before, it takes a lot of trial and error. One of my trials included finding a filter that would reduce the plosives.
First, select the “Effects” tab. From there, hover over “Filter and EQ.” In this tab, there will be the “FFT Filter” option. Click it.
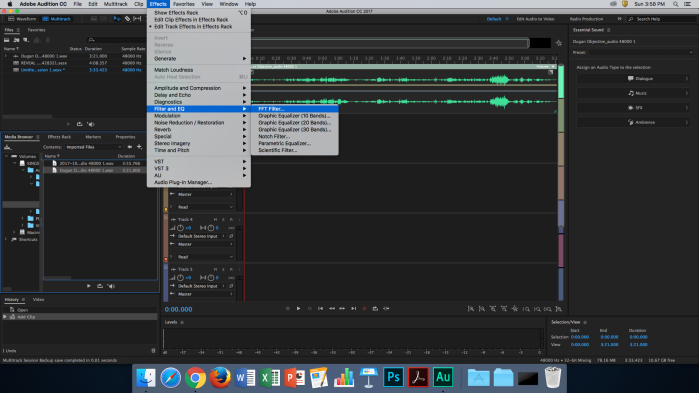
From there, a box should appear.
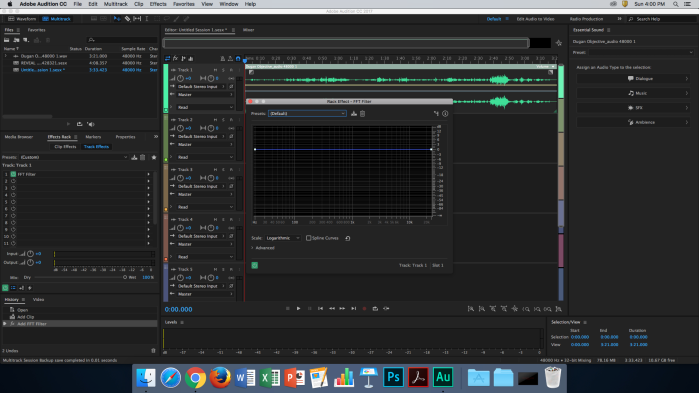
In this pop-up, select the “Presents” pull down menu. From there, click on “De-Esser.”

This filter alone should remove most of the popping s and p noises. However, sometimes it doesn’t fix all of the problems. To reduce any of the really stubborn plosives, play around with the blue bar while the audio is playing.
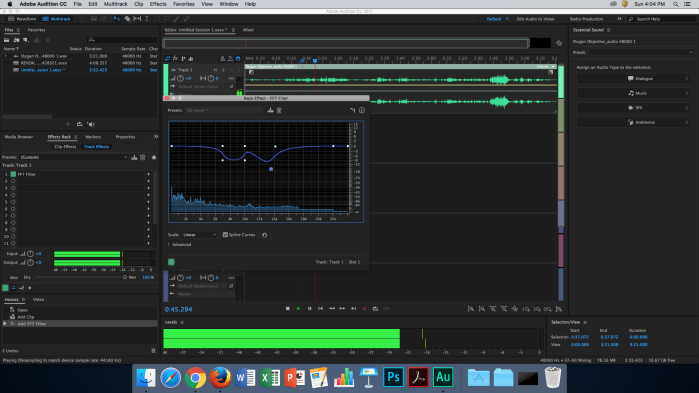
While this is a quick fix for many of the smaller plosives, it doesn’t always fix them all, not even after adjusting the blue equalizer bar. If this is the case, rerecording the audio might be the best choice.
Audio Description Artist Statement
Artist’s Statement
For my audio description project, I decided to create commentary for Disney’s Mulan. Growing up, this movie was my favorite. I knew every song and could practically recite every line. Today, I still love the movie. But when I think about people not being able to watch the movie, or at least experience it in its entirety, I knew I had to create description for Mulan. Everyone should have a change to enjoy this movie, music, action sequences, and all.
I soon regretted my decision, however. Although I loved this movie, I never realized how difficult creating audio description would be. I didn’t want to pick a singing scene because I didn’t want to talk over the music. The rest of the movie wasn’t much easier to pick from. As I found out as I re-watched it, Mulan is very dialogue heavy. There was rarely a scene where there wasn’t any singing or any long pauses. Therefore, choosing a scene in which I had enough time to actually describe.
Then came the fact that, because it was animated, there were no ambient or background noises As a result, there weren’t many context clues as to the movements occurring on scene. This absence, however, made it easier to complete the foley recording. For that one, I chose the reveal moment. A lot this scene is made by big movements and I wanted to reflect that. For example, they are on a snowy mountain. Therefore, I wanted to create the sound of footsteps in the snow. For that, I used a combination of leather and thumping sounds. This scene also features a horse rearing up. Though the horse’s whinnying is heard, I added in clinking metal to recreate the sounds from the buckles.
For the actual audio descriptions, however, I had to work harder to sync everything up. This meant recording the audio multiple times in order to have everything at the right moment. Additionally, as I recorded, I realized that some of my descriptions were too long and I had to change some of my wording in order to fit things appropriately, especially for the creative description. Because this scene required more subjective wording, I tried using very descriptive language. Many of those words were long and unnecessary. So, I had to find replacements that were just as descriptive.
However, after I figured that out, I worked hard to accurately portray the tone of the movie. For the objective description, I kept my voice even and neutral while occasionally adding an up-tilt in my inflection to convey the whimsy of the scene. For the create description, I made my voice solemn to match the somber mood of the reveal. These choices were subtle so that they didn’t distract from the actual scenes but I still wanted to have some sort of artistic flare.
Additionally, much of the problems I faced with this project came from the editing. Originally, I attempted to use the software Audacity, which was already installed on my computer. In the end, however, I couldn’t edit out the plosives and s sounds well enough. I instead chose to finish the project on Audition. With that decision, I was able to edit out most of the loud popping sounds and could also edit the volume levels.
I found that once I did all that, my project came together rather nicely. My descriptions were not the most accurate or concise but my wording was powerful and my timing was pretty accurate. Additionally, I realized that I could also navigate Audition much better afterwards. Although I struggled for much of it, by the end I could add filters, alter volumes, and adjust timing so that my project was a success. In the end, I completed two audio descriptions that, I hope, would allow the visually impaired to enjoy Mulan as much as I do.
Blog #7
When rewriting my audio descriptions, I noticed one major change I had to make for both: I had to incorporate more pauses in my narration. Because I wrote my descriptions on The Office, there had to be a lot of dead space in order for the characters to finish talking. This show is very dialogue heavy and my original narrations didn’t allow for that. In rewriting this, I had to cut a lot of my descriptions down. I tend to be pretty wordy and this forced me to reevaluate my writing a little bit.
I also had to change some of my wording. This show is very comedy based but there is no laugh track. I tried to use adjectives that reflected the tone of the episodes. A lot of the humor comes from the looks the characters give each other or the camera. It also comes from the situation and staging of the episode. Therefore, in addition to shortening the length, I also tried to make every word meaningful. Every word I used had a purpose and contributed to the overall feeling of the show.
Additionally, when actually recording it, I found that my bedroom made a perfect space. However, I had to find a time of day in which outside noises or my roommates couldn’t be heard. Therefore, following the advice we were given in class, I recorded my audio later at night, in my closet. The sound quality actually turned out pretty nice despite having just used my iPhone earbuds. I did, however, need to adjust my distance from the microphone. Originally, and during my recording for the photo essay project, I was too close to the microphone and my “p’s” and “b’s” sounded harsh. I had to keep this in mind when recording my audio descriptions.
Blog Post #6
Listening to audio description for the first time is very jarring. I have watched Daredevil multiple times through but, ironically, never with audio description on. (This show is literally about a blind character and I hadn’t done the one obvious research on this condition after my obsession with the show). Watching it was audio description was quite the experience. As someone who is sighted, I found the descriptions distracting. They really took me out of the mindset of the show and I found myself focusing more on the dry-cut voice-overs than the actual plot. In fact, I was shocked from the very start when the man even described the opening credits.
But then I decided to pause and take a step back. I was taking my vision for granted. For someone unable to see, these descriptions literally explained the thing missing from their viewing experience: sight. So I then watched a show I had never seen before, with the screen turned away from me. Although it wasn’t the same as actually watching, I can imagine that the descriptions supplement the video adequately because of how descriptive they are. Though someone like me found them distracting at times, they are an extremely helpful invention.
Therefore, I decided to create audio description for one of my favorite shows: The Office. I chose to describe the pilot of the show from (00:35-01:20)
Objective:
Two men are sitting at desk in an office. In the shot are a copying machine, another desk, and various electronics. There is a close-shot of a man talking. The camera zooms out so that the back of another man comes into view. The first man, Michael, smiles. Switch to another long show, Michael and Jim are sitting in the office and Michael is now on the phone. Close up of Michael on the phone. As he talks, he looks off-screen where Jim is sitting. The scene is of an office. A woman stands at the copier, scanning papers. Another woman is hunched over a computer at her desk. And a man walks away from the camera, reading over a paper. Cut back to Michael, still talking on the phone. Jim is still in the room.
Subjective:
Two men sit at a desk, one lounging casually as he talks, the other sits stiffly listening. There is a close of a man. He looks inquisitive. He spreads in arms in response to Jim’s answer, welcoming the attention. He smiles proudly, looking straight at the camera for reassurance. Michael looks focused as he speaks on the phone. Jim sits there listening but looking bored. As he speaks, Michael constantly looks towards Jim, his eyes searching for a reaction. The office scene looks uneventful. The workers go about their work, mindlessly, unaware of what’s happening inside of Michael’s office. Michael looks excitedly at Jim. He seems proud but his demeanor changes. He looks down, abashed, as he apologizes. Hanging up the phone, he lets out a small smirk. He looks uncomfortable but amused as he explains the situation.
Blog #4
One of the most important things to do know while working with Photoshop is how to create and manipulate layers. With layers, you can bring certain things to the forefront of the picture or push things to back. You can also alter how certain areas of the photo look, through coloring, additions, or subtractions. However, layers also make it much easier to fix any mistakes. Instead of having to undo things until you fix the mistake, you can just select the layer the issue is on. Then you can either delete it for alter that layer.
But how do you actually work with layers?
To start, select the menu bar. Then click on Layer and New Fill Layer. This will create a new layer on the original photo. However, there is a shortcut to creating a new layer. Down at the bottom right corner, where the layers are listed, there is a button that looks like a page being folded over. Clicking on that will create a new layer. 
Now, with a new layer, you can manipulate your image however you want without changing the original. Just highlight the layer and do your work. Even better, once you begin to build even more layers, the screen to the left of each will show exactly what that layer looks like. If that isn’t enough though, you can always rename the layer to tell you exactly what it is.
But, what if you aren’t sure you like changes you made on a new layer? There is always the option to delete it. However, before doing anything drastic, you can check if you actually like the layer or not. On the left side of each layer bar, there is a small eye. 
That eye close and then will hide the layer from view. This is an easy way to tell if you like your photo better with or without a specific layer. Even better, if you decide the layer should be there, you can always just re-click the eye and it’ll be visible once more.
